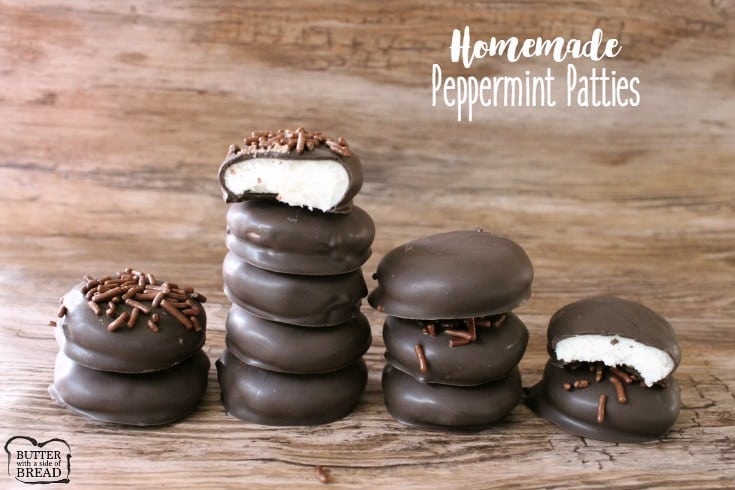
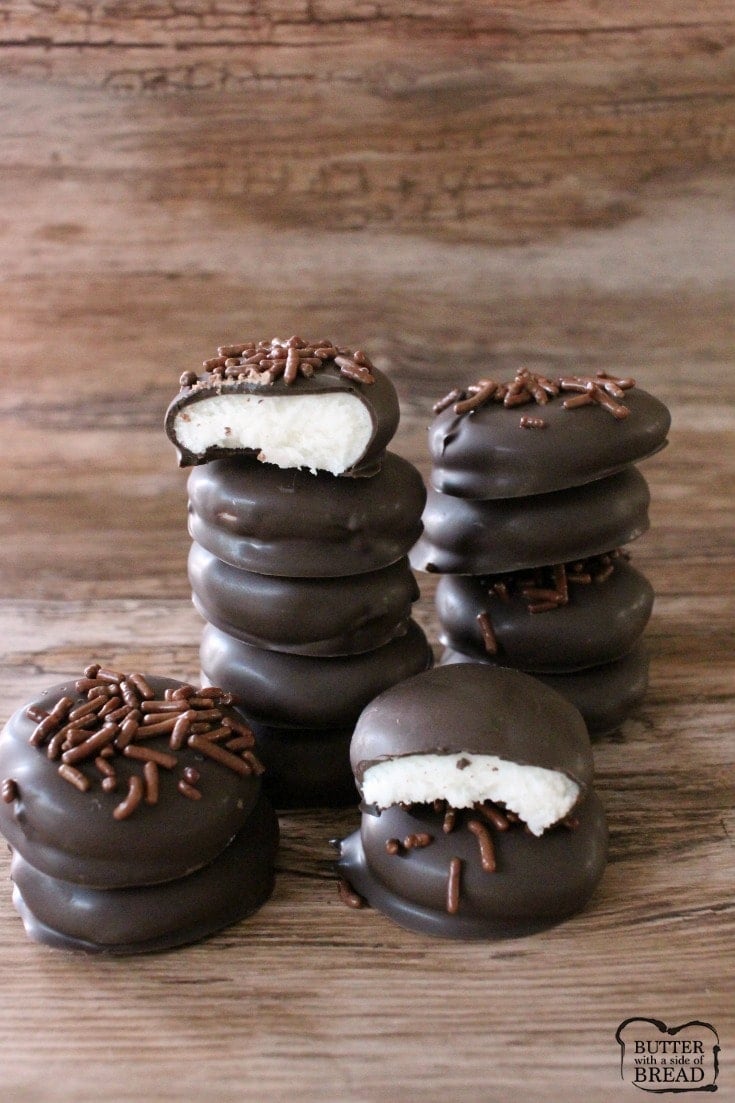
Easy Homemade Peppermint Patty recipe with just a handful of ingredients! Copycat York Peppermint Patties but BETTER. Simple soft, sweetened mint candy covered in chocolate for a delicious, easy peppermint patty candy.
Be sure to check out our updated collection of SANTA APPROVED CHRISTMAS SWEETS & TREATS here!
What are Peppermint Patties?
Peppermint Patties are candy made from a simple recipe of butter, powdered sugar, corn syrup and peppermint extract. I dipped mine in dark chocolate then sprinkled some with chocolate jimmies. The result? Incredible homemade peppermint patties that taste even better than York Peppermints! They’re softer, have better flavor and hello, in under an hour you have an entire tray of peppermint candies! They’re perfect for parties or gifts. Customize them with different colored sprinkles, white chocolate, add coloring to the mint candy.
How can you make a Peppermint Patty recipe?
Homemade peppermint patties are made by mixing together 4 simple ingredients: butter, powdered sugar, corn syrup and peppermint extract. I like to use a stand mixer simply because it makes the recipe come together faster and the dough is evenly mixed, but you can stir it, then knead with your hand if you’d like. No rolling out or cutting the dough into shapes, simple pinch off a section, roll it in your hand then slightly flatten it. That’s it! Place patties in the freezer to chill, then cover in chocolate.
What’s that 3 pronged fork you use to dip your peppermint patties?
The 3 pronged fork I use to dip each peppermint patty is a handy Wilton Dipping tool. It’s part of a 3 piece set that make it so incredibly easy to dip candy in chocolate.
 Homemade York Peppermint Patty recipe ingredients
Scroll down for Printable Recipe!
- 1/4 cup softened butter
- 1/3 cup light corn syrup
- 1-2 tsp peppermint extract*
- 3 cups powdered sugar
- 2 cups dark dipping chocolate**
- chocolate jimmies, if desired
How to make Copycat York Peppermint Patty candy
- Combine butter, corn syrup, extract and powdered sugar in a mixing bowl. Mix with an electric mixer for about 3 minutes, until ingredients are well combined and are holding together.
- Remove dough from bowl and break off about 2 teaspoon-sized sections. Roll into a ball and gently flatten with your hands. Put patties down on a pan lined with wax or parchment paper. Once all patties are made, place pan in the freezer for 10-15 minutes.
- Melt chocolate in microwave for 1 minute 20 seconds. Let sit for an additional minute in the microwave. Remove and gently stir. Remove peppermint patties from freezer. Use a fork or a handy Winton Dipping tool like I did to dip each patty in the chocolate, flip to coat the other side, then tap to remove any excess. Transfer chocolate coated patties to wax paper to cool. Top with chocolate jimmies if you’d like.
- Store in an airtight container, refrigerate if preferred but it’s not necessary. Yields 40 mints.
*Add 1 teaspoon peppermint extract, then mix until well combined. Taste dough. If you’d like them to be stronger, add an additional 1/2 to 1 teaspoon extract. You can also use 2 drops of peppermint essential oil instead or even 2 teaspoons mint extract for a more subtle mint flavor. Think Andes Mints as opposed to Starlight mints! Yum.
**When making candy like this I really find that dipping chocolate just works best. You can purchase Ghirardelli Melting Wafers at most grocery stores. I buy my melting chocolate in bulk on Amazon. If you really want to use chocolate chips instead, I suggest melting 1/2 a tablespoon of shortening or 2 tsp coconut oil in with the chocolate chips, to thin it out and make it easier to dip the candy.
Like this Homemade Peppermint Patties recipe? Check out some other easy candy recipes of ours:
- Homemade Almond Joy Bars
- Microwave Pumpkin Spice Caramels
- Tiger Butter Candy
- Chocolate Peppermint Truffles
- Gooey Holiday Chex Mix
- Easy Cracker Toffee
- Marshmallow Chocolate Covered Pretzels

HOMEMADE PEPPERMINT PATTIES
Ingredients
- 1/4 cup softened butter
- 1/3 cup light corn syrup
- 1-2 tsp peppermint extract*
- 3 cups powdered sugar
- 2 cups dark dipping chocolate**
- chocolate jimmies if desired
Instructions
- Combine butter, corn syrup, extract and powdered sugar in a mixing bowl. Mix with an electric mixer for about 3 minutes, until ingredients are well combined and are holding together.
- Remove dough from bowl and break off about 2 teaspoon-sized sections. Roll into a ball and gently flatten with your hands. Put patties down on a pan lined with wax or parchment paper. Once all patties are made, place pan in the freezer for 10-15 minutes.
- Melt chocolate in microwave for 1 minute 20 seconds. Let sit for an additional minute in the microwave. Remove and gently stir. Remove peppermint patties from freezer. Use a fork or a handy Winton Dipping tool like I did to dip each patty in the chocolate, flip to coat the other side, then tap to remove any excess. Transfer chocolate coated patties to wax paper to cool. Top with chocolate jimmies if you'd like.
- Store in an airtight container, refrigerate if preferred but it's not necessary. Yields 40 mints.
Video
Notes
📫 Save this recipe! Send it to your email! 📩
I consent to receiving emails from this site.
How do you melt chocolate in the microwave?
Melting chocolate in the microwave is easy if you go slowly. Always use a glass or ceramic bowl and chocolate that’s not old. To melt 1 cup of chocolate chips I’d begin with 1 minute in the microwave. After the 1 minute, let chocolate sit for 2-3 minutes. Then, gently stir and see if chocolate begins to melt smooth. If it’s still really solid, add 20 seconds in the microwave, then let it sit again.
Often chocolate looks like it’s not melted when it really is, and you don’t know for sure until you gently stir it. If your chocolate melts but it’s too thick to work with, try adding 1/2 teaspoon of coconut oil or shortening, then letting it melt and stirring it in.
Can you freeze homemade York Peppermint Patties?
Yes, you can freeze these homemade York peppermint patties! Ensure the chocolate has fully set so that they don’t stick. Then store the peppermint patties in an airtight container. My favorite airtight containers are Snapware. I’ve found that when I use Snapware, the foods generally stay fresh for at least 3-4 days longer than when you use regular tupperware. You can freeze peppermint patties for 4-5 months in air tight containers! If you simply want to freeze them in a ziplock bag, just plan on freezing them for 4-6 weeks, so that they don’t develop frost burn. Be sure to thaw peppermint patties on the countertop.
Peppermint Patties made from scratch with a handful of ingredients! Easily combine butter, sugar & peppermint then dip in chocolate for these tasty treats!









Lauren Ford says
These patties are too good to even exist!!! I couldn’t stop eating them!! I even tried adding lemon instead of peppermint, and it tasted, just YUMMM!!! Totally recommend these to any chocolate and peppermint lovers!!
Nellie says
What a great idea to make these with lemon! I’m going to have to try some new flavors now too!
Wilson William says
you knead the dough before forming the balls and making the patties in the video… there is no mention of kneading it in the recipe… is this an oversight or is the kneading not necessary?
Jessica says
You can mix/ knead until you’re able to handle it. I was just trying to show the consistency in the video – that it can be handled. : )
M J Muprhy says
I have a hubby with diabetes and recently found sugar fee powdered sugar. I usually exchange Agave sryup for Light Syrup and have a bunch of Sugar Free Chic chips…. so I am going to try making this a sugar free method. Hope it works out, he would love them!!!
Alison says
Let us know how it goes!
Heidi Gordon says
Favorite in my family and so easy
Alison says
I’m so glad you and your family enjoy these Heidi!
Carol says
Love this recipe. I make it several times a year
Sandra Brown says
Delicious! My only problem was the chocolate dipping wafers I used resulted in chocolate that was too thick to handle easily.. I should have read the whole article and thinned it down with shortening. And maybe next time I’ll try almond extract! Yummy!!
Jill Cormendy says
I’m looking for Xmas cookie receipt and I cannot remember the name. It’s small ball-covered powder sugar – not very sweet. Sometimes ball have nothing in them or have some type of peanut in them. I see Wedding cookies and Mexican cookies but these are not what I am referring to please let me know.
Nicole says
It sounds like you could be talking about my Almond Crescent cookies they aren’t round but are covered in powdered sugar and do contain a nut, much like wedding cookies and Mexican cookies do.
Alicia Wyatt says
This recipe makes the best consistency peppermint patties that are so easy to work with and are SO delicious!!! everyone’s favorite of all the Christmas treats this year.
Nicole says
That’s awesome to hear! So glad you all liked these!
Ryan Weaver says
Tried this tonight but the dough was so stick it would stick to my hands forming the ball. Any ideas maybe it needed kneeded longer> I used a stand up mixer. Thanks
Nicole says
Possible reasons could vary but I recommend not overmixing the filling and next time it’s super sticky, try adding in a little powdered sugar at a time until it becomes easier to work with. Maybe a tablespoon or so at a time until incorporated.
Sharon Z. says
Super simple and addictive results. I’ve never seen anything disappear as fast as these did, and my family has been begging for more. Purposely not making them too often, otherwise we would all be gaining weight. One hint, don’t make your patties too thin or they will begin to melt when you dip them. You will end up with an incredibly delicious piece of abstract art. Just getting ready to make a batch.
Jessica says
LOL- abstract art! I kind of love it! So glad you enjoyed them Sharon!
Al says
These are my go-to mints at Christmas. However, I make them in little balls, dip in milk chocolate and then in semi sweet chocolate (not all at once, I freeze till hard between dippings). The best thing about this recipe is that I swear these mints get better the longer they sit in the frig!
Jessica says
Sounds so good Al!
Missy Weiner says
I made this at holiday time last y)ear and then made it again 2 more times! This year, friends have already asked if I will make these again this year. They are a huge hit with everyone and soooo easy to make.
Jessica says
So glad to hear you like them! We love them too!
Maisy says
How long do these last for? They look amazing! I can’t wait to try them!
Jessica says
If kept in an airtight container they last about 10 days.
Michelle says
Sorry, do you mean a WILTON dipping tool? Just making sure I get the correct one😊
Jessica says
HA! I fixed it. YES, it’s a Wilton dipping tool. : ) I love mine so much!
Dan says
So infuriating working with this dough. Used up another cup of confectioners sugar because it was so sticky I had trouble picking it up off the counter bith before and after cutting it the circles. Cleanup was ridiculous scraping the sticky dough off the counter. This is a recipe I will stay away from in the future.
Jessica says
You don’t roll and cut circles with this recipe… I think you might have been using a different recipe?
Pam says
Loved this treat. The 1st batch was sticky. I think I mixed it too long. I just added some confectioner’s sugar to make dough manageable. When I dipped the white filling in chocolate after freezing, the filling started melting and made it a little difficult to get off dipping tool. The chocolate got stiff before I got done dipping all the mints. After reheating in the microwave a couple of times, the chocolate got harder not runnier. What was I doing wrong?
Jessica says
When dipping candy in chocolate, you do have to be fast. Work in small batches, leaving undipped candies in the fridge until you’re ready to dip them. If you overheat your chocolate, it will seize, which sounds like what happened- it gets thicker and chunky. Thinning the chocolate with shortening or coconut oil helps a ton. Sometimes I put a heating pad under the bowl of chocolate to keep it warm while I’m dipping! (A rice pack you put in the microwave works well!)
Peggy Baker says
Always turn out perfect. My families favorite besides my buttercreams.
Jennifer says
Everyone LOVES LOVES LOVES this recipe! I am new to this technique, so I am a little slow. I have made this recipe a few times now, and I usually make a double batch. Roughly just under 100. Here is what I do to make it easier for a novice, like me:
I found it easier to work with the filling if I chilled it before rolling them into balls. I had the brilliant idea of using silicone moulds to get a professional look. I sprayed the moulds with PAM and then filled them up. This ensured they were roughly the same size, and it gave them a n even look! After filling the moulds I placed them in the freezer to harden before dipping them in the chocolate.
I prefer using a double boiler for the chocolate. This way I could work at whatever pace I wanted and the chocolate stayed smooth. I eventually bought the dipping wand, and what a difference it maked! I now know how to dip the fillings and not make an absolute mess everywhere.
Because I am 1) slow and 2) making about 100 at a time, I wanted to make sure the fillings did not get mushy before dipping them. I use about 4-5 silicone moulds at a time, so I take only 1 out of the freezer at a time. I popped the fillings out and put them in a bowl over which I placed over ice. This made it easier to flip it in the chocolate. The fillings stayed solid and did not break down.
Thank you for this recipe! I was looking for a way to use up all of my powdered sugar, and not iced frosting,
Nellie says
Thank you so much for sharing all of your suggestions! So glad you enjoyed the recipe Jennifer!