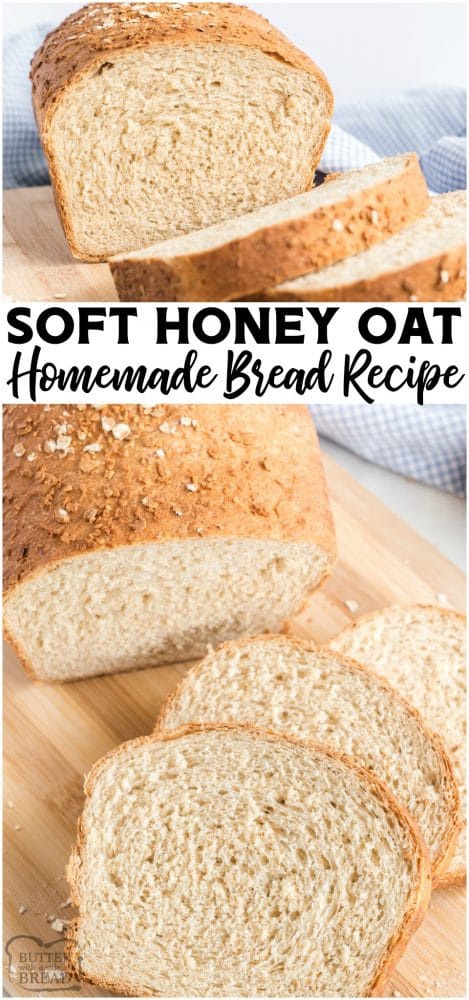
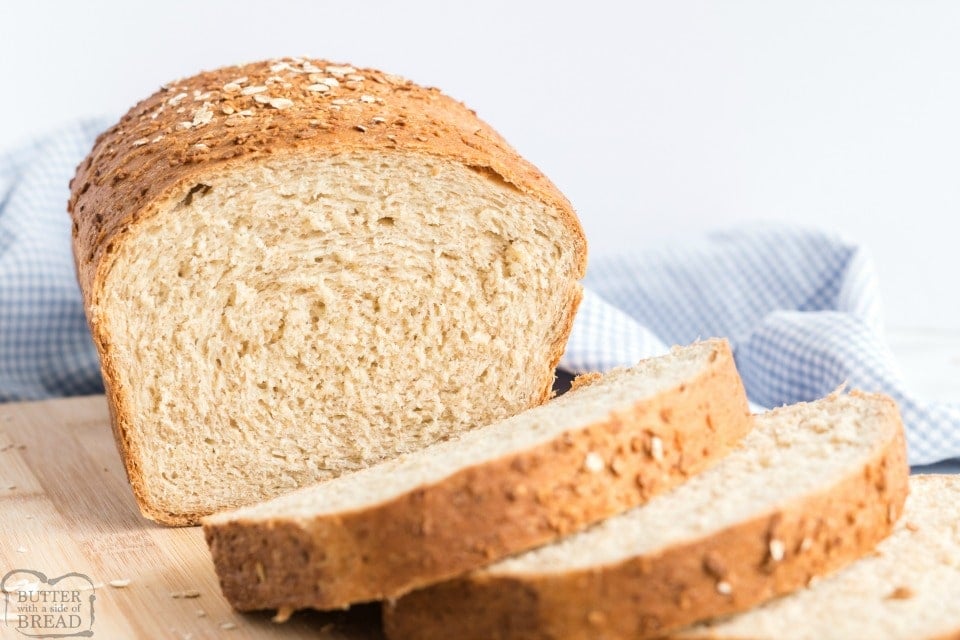
Honey Oat Bread is a loaf of soft, utterly delicious homemade bread made with classic ingredients including oats, milk, olive oil & honey.

Honey Oat Bread is truly my favorite! There’s something special about baking fresh bread at home, and when I stumbled upon this recipe, I couldn’t wait to give it a try. The result was incredible! I believe homemade bread tastes best on the day it’s baked, so I sliced some for my kids’ after-school snack and served the rest at dinner.
Ingredients for Honey Oat Bread
Dry Ingredients
3 cups all-purpose flour (or half whole wheat flour): Provides the structure and texture of the bread.
¾ cups oats (either instant or old-fashioned): Adds flavor and a chewy texture.
1 TBSP instant yeast: Acts as the leavening agent, helping the dough rise for a light and airy loaf.
1 ½ tsp salt: Enhances the overall flavor
Wet Ingredients
1 cup milk: Adds moisture and richness, contributing to the bread’s soft crumb and enhancing flavor.
¼ cup lukewarm water: Activates the yeast, helping it to rise effectively when combined with other ingredients.
2 TBSP light olive oil: Provides richness and a tender texture, contributing to the overall flavor and mouthfeel of the bread.
¼ cup honey: Naturally sweetens the bread
Toppings
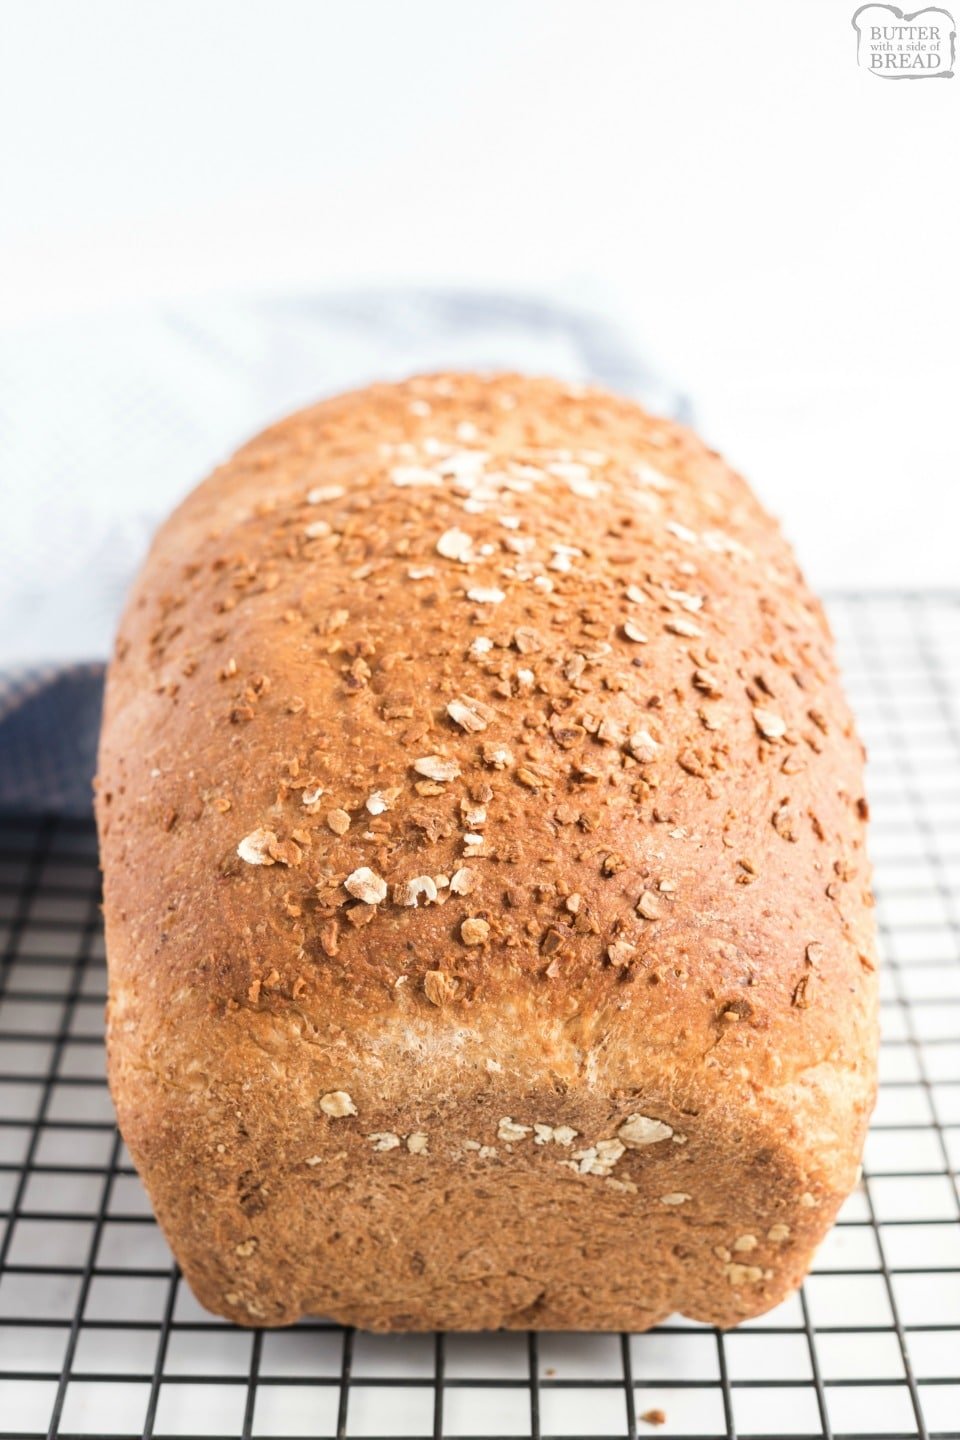
1 ½ to 2 TBSP oats: Sprinkled on top for added texture and visual appeal
1 ½ to 2 TBSP warmed honey: Adds a glossy finish and an extra touch of sweetness on top of the loaf.
Making Homemade Honey Oat Bread
If you’ve never made bread before, here is the basic formula for making your own at home:
Step 1: Combine Dry Ingredients
In a large mixing bowl, whisk together the flour, oats, yeast, and salt until evenly combined.
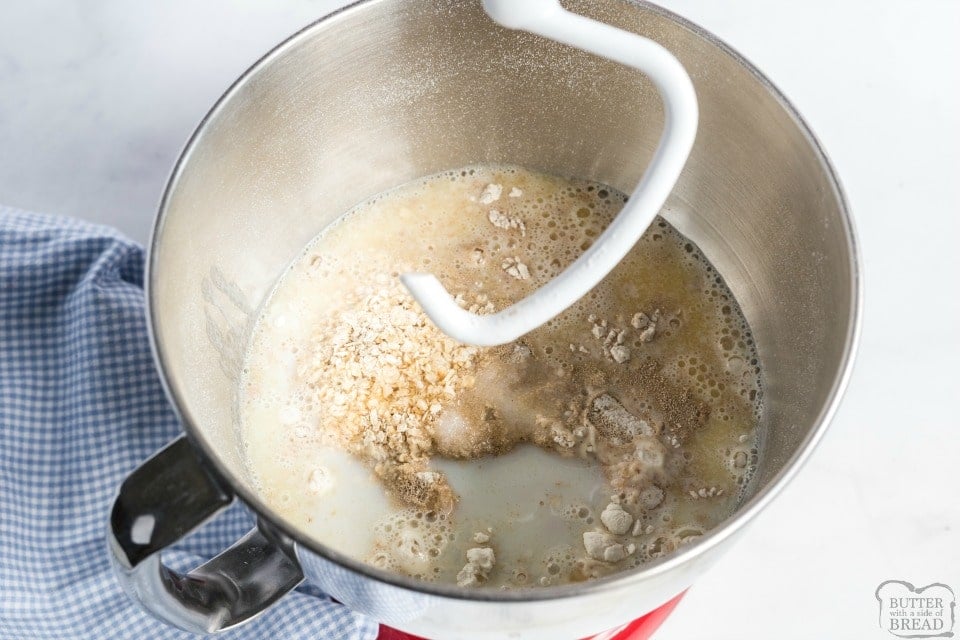
Step 2: Combine Wet Ingredients
Warm the milk until it’s just slightly warm to the touch (not hot). In a small bowl mix the warmed milk, water, melted butter, and honey.
Step 3: Mix and Knead the Dough
Stir the wet and dry ingredients together until a soft dough forms. Mix with a dough hook until it just comes together. Continue to knead in the mixer, with the dough hook attachment, for about 7-10 minutes. You want the dough smooth and elastic.
Tip: If the dough feels too sticky still after 5 minutes of kneading, add a little flour, one tablespoon at a time. If the dough is too dry, add water, 1 teaspoon (5 ml) at a time, to soften it up.
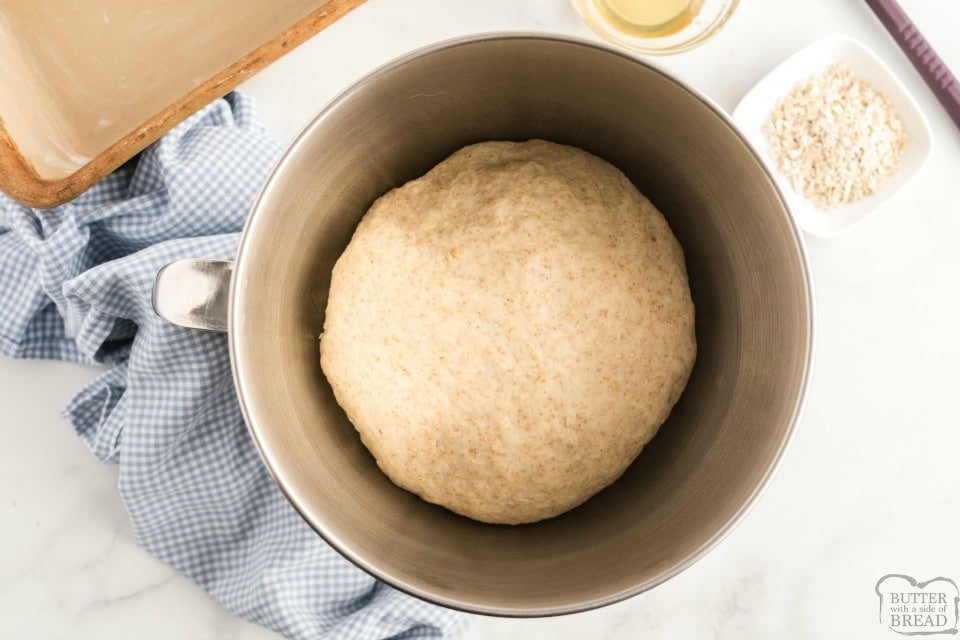
Step 4: First Rise
Place the dough in a lightly greased bowl and cover it with a clean towel or plastic wrap. Let it rise in a warm place until doubled in size, about 30–60 minutes.
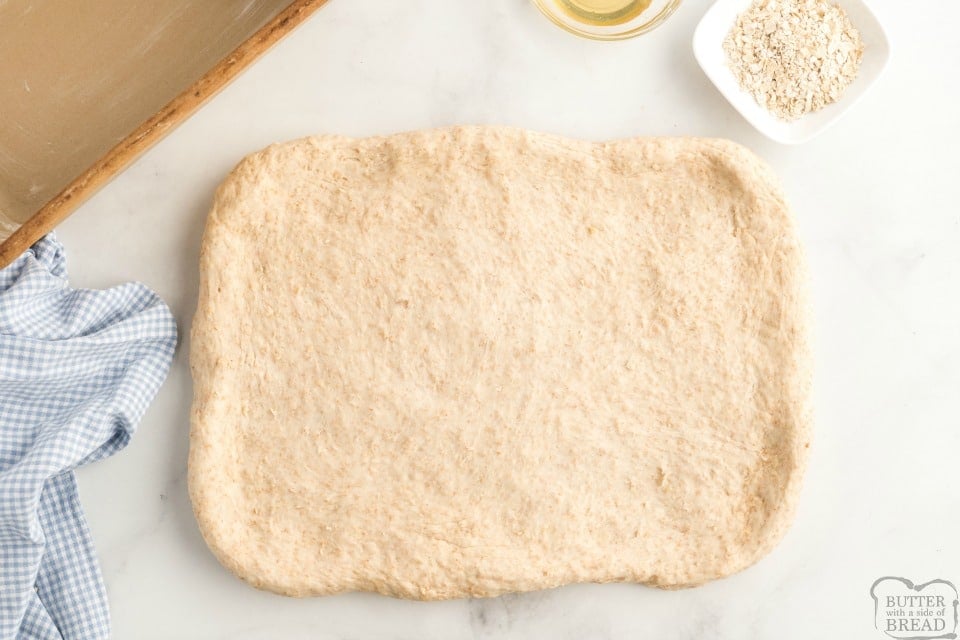
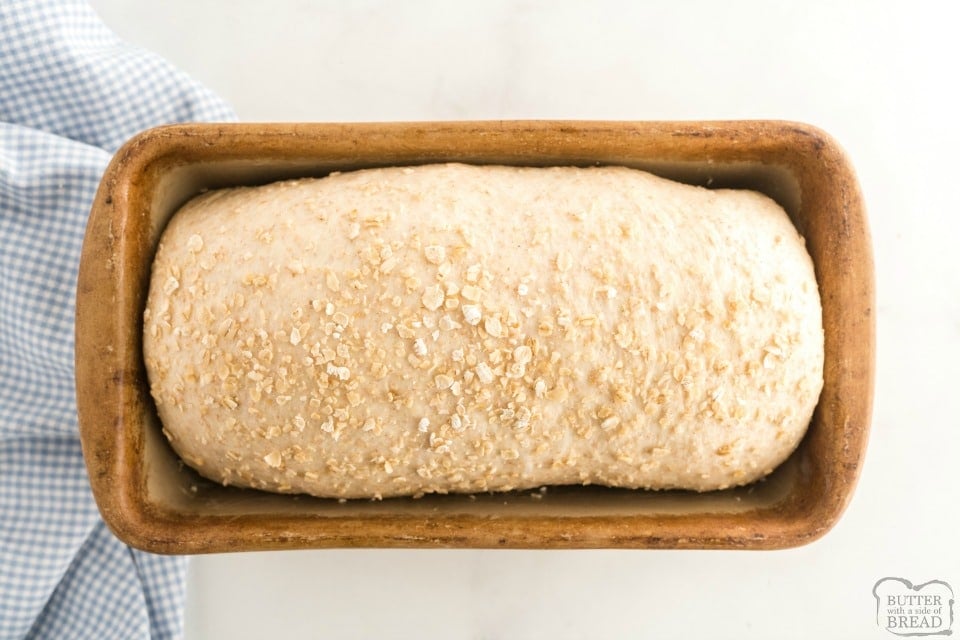
Step 5: Shape the Dough
Once doubled, transfer the dough to a lightly floured surface if needed. Flatten into a 9×12-inch rectangle, then roll tightly into a loaf, tucking in the ends. Place in a greased 9×5-inch pan, brush with warmed honey, and sprinkle with oats.
Step 6: Second Rise
Cover the loaf loosely and let it rise again in a warm spot until doubled, about 30 minutes. (In colder weather, I use a slightly warmed, turned-off oven with the light on.)
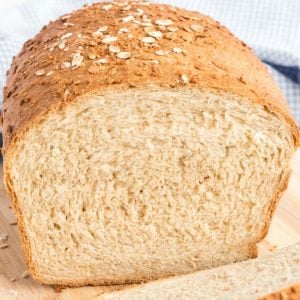
Step 7: Bake the Bread
Bake for 40–50 minutes, or until the top is deep golden brown and the internal temperature reaches 190–200°F (Breads with milk should reach closer to 200°F.)
Step 8: Cool the Bread
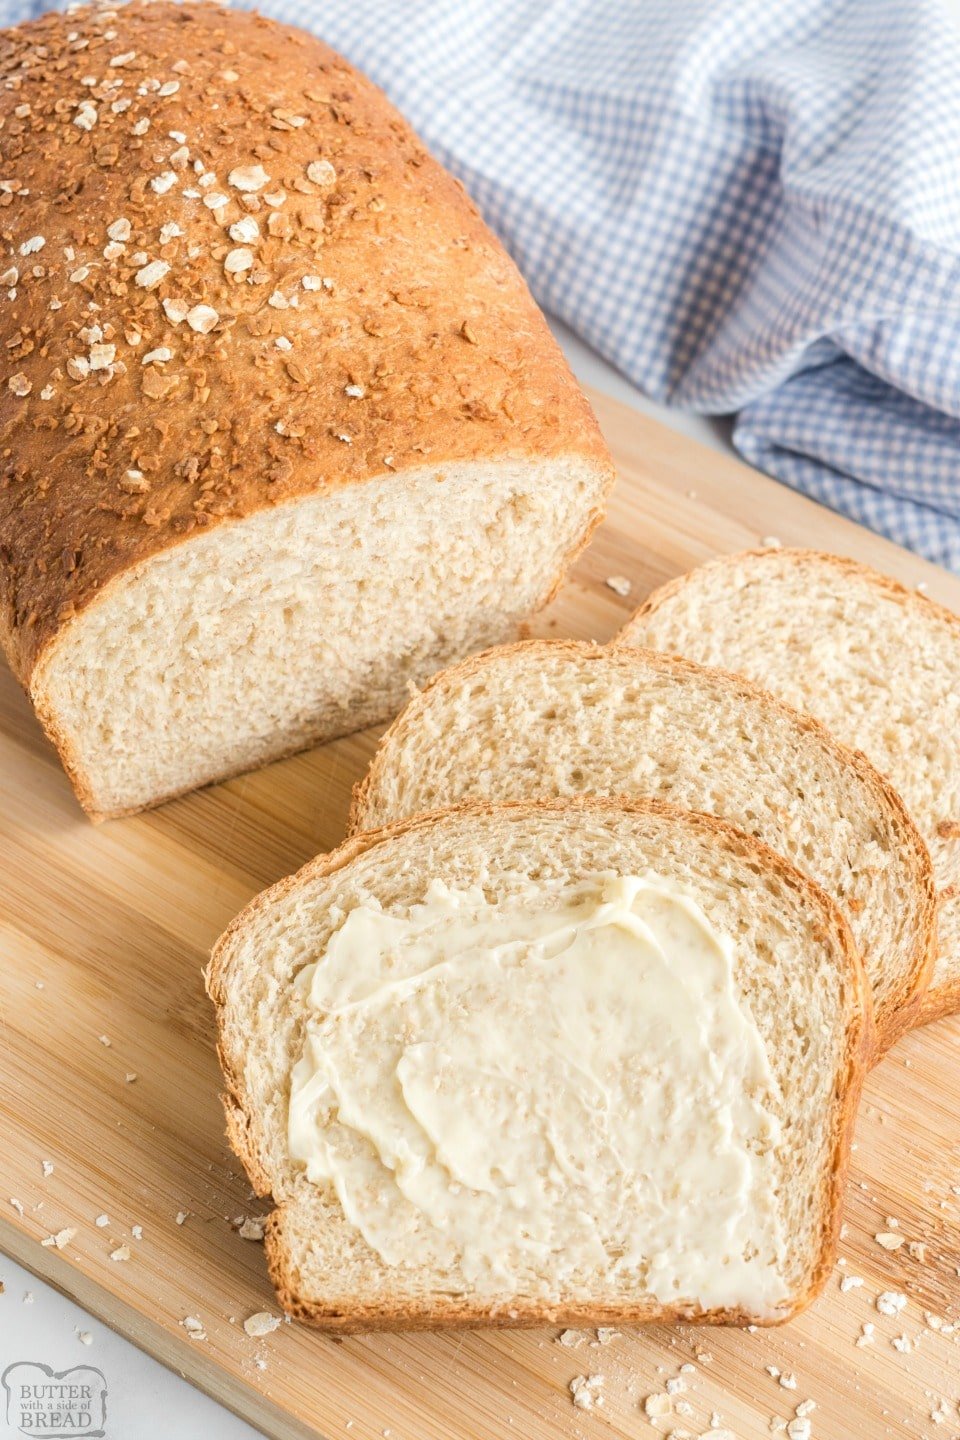
Let the bread cool in the pan for about 10–15 minutes, then transfer it to a wire rack to cool completely.
Allow at least 20 minutes before slicing—cutting too early can cause the loaf to collapse or become gummy.
Honey Oat Bread
Ingredients
- 3 cups all-purpose flour can use half whole wheat flour
- ¾ cups oats either instant or old fashioned
- 1 TBSP instant yeast
- 1 ½ tsp salt
- 1 cup milk
- ¼ cup water lukewarm
- 2 TBSP light olive oil
- ¼ cup honey
Toppings
- 2 TBSP honey warmed
- 2 TBSP oats
Instructions
- In a large bowl, or the bowl of a standing mixer, combine the flour, oats, yeast, and salt.
- In a small bowl, warm the milk slightly, but not boiling. Add the olive oil, then stir in the water and honey.
- Pour the milk mixture into the flour mixture, mixing with a dough hook until it just comes together to form a dough. Knead with the dough hook attachment, for 7-10 minutes, until the dough is smooth and elastic (if you’re making this recipe by hand, the dough will be very sticky at first; flour your hands and work surface generously and be patient). If the dough is still very wet and sticky after 5 minutes of kneading, add more flour, 1 TBSP at a time, until the dough is barely tacky. If the dough is too dry, add water, 1 tsp at a time, to soften it up.
- Place the dough in a lightly oiled bowl, cover, and allow to rise until doubled, for about 30-60 minutes.
- Once doubled, place the dough on a clean, dry work surface. If the dough is too sticky, lightly flour the surface before continuing. With your fingers, flatten the dough into a 9×12-inch pan. Tightly roll the dough, tucking the ends as needed, into a loaf. Brush the top with the warmed honey and sprinkle with the oats. Allow the loaf to rise in a slightly warm location until doubled, about 30 minutes.
- When dough has doubled, preheat oven to 350 degrees (180 C). Bake for 40 to 50 minutes, until the bread is deep golden brown and the internal temperature is about 190-200 degrees. Transfer to a wire cooling rack and allow to cool completely before serving. Slice, serve, & enjoy!
Video
Notes
Nutrition
📫 Save this recipe! Send it to your email! 📩
I consent to receiving emails from this site.
How do you store homemade bread?
Fresh honey oat bread is best enjoyed within 2–3 days when stored at room temperature. Keep it tightly wrapped or in an airtight container to maintain softness. These bread bags are pretty amazing!
Freezing is also highly recommended if you want it to last longer. Wrap tightly in plastic wrap and place in a freezer bag or airtight container. It keeps well for about 2–3 months in the freezer.
To use, thaw at room temperature, or warm slices in the toaster or oven for a fresh-baked feel.
Can I use all whole wheat flour?
Yes, but the bread will be denser. For best results, I recommend using half all-purpose and half whole wheat flour so the loaf stays soft and light while still having a hearty flavor.
Why didn’t my dough rise?
This usually happens if the yeast is expired or the liquid was too hot or too cold. Make sure your yeast is fresh and your milk is warm—not hot—to help activate it properly.
Best Bread Pan?
I bake a lot of bread and the pans I prefer are either ceramic, glass or cast iron. These pans will bake bread more evenly and release the bread more easily after baking. I don’t like using dark or nonstick pans because the bread cooks unevenly. It darkens on the outside before the bread is cooked on the inside, so the coloring is uneven. Read more about which bread pan is the best here!
Why is my bread dense?
This can happen if too much flour was added, the dough wasn’t kneaded enough, or it didn’t rise long enough. The dough should be soft and slightly tacky, not dry.
Try more amazing soft, homemade bread recipes here:
- This easy homemade bread comes out soft, fluffy, and bakery-worthy every single time—and you only need a few pantry staples and about 2 hours. If you’ve ever wanted to bake fresh bread from scratch without the stress, this foolproof recipe is the one to start with.
- Try our easy, beginner-friendly honey wheat bread recipe that makes homemade bread feel totally doable (and absolutely worth it).
- Copycat Cheesecake Factory brown bread is soft and slightly sweet with hints of molasses, brown sugar, and honey in every bite. It’s an easy homemade version of the restaurant favorite.
- Tender and unbelievably easy to make, this homemade buttermilk bread is made with just 6 simple ingredients. With rich flavor and that melt-in-your-mouth texture you’ll want to make on repeat.
- Homemade vegan bread—no one will guess it’s dairy-free! It’s an easy, foolproof recipe that makes two beautiful sandwich loaves you’ll want to use for everything.
This honey oat bread is made with wholesome ingredients like whole wheat flour, milk, and honey. It’s the kind of cozy homemade loaf that works just as well for snacks as it does alongside dinner.


Candace says
Can I subsitute maple syrup instead of honey? If so, how do I adjust the water amount?
C. Roman says
BEAUTIFUL!!! I had been looking for an oatmeal bread recipe because I am sensitive to whole wheat and this beautiful loaf delivered on all counts. I only used 1 tsp yeast and added about 30 minutes to each rise. I used the Pyrex glass 8 x 4 loaf pan. The rise and crumb were perfection. The taste and texture are amazing. Your recipe is a homerun in my book.
Jane says
Can I use whey in place of the water and milk?
Jessica says
I can’t imagine why that wouldn’t work, Jane! I say go for it!
Esther says
Can I leave the dough outside all night long ?
Nicole says
I cannot recommend allowing the dough to rest at room temperature for overnight. The yeast will overproof and give you very dense results. If you want to make the dough and let it rest overnight, stop at the second rise and instead of baking, keep it in the baking pan loosely covered in greased plastic wrap and let it rest in the fridge for up to 8 hours. in the morning place it on the counter while the oven preheats and then bake as directed.
Joanna says
This is great we love this bread. Can it be made in a breadmaker? I’d like to give it a try.
Janice says
I recently made thisbread but mine came out to be dense and not light in texture. I followed the recipe exactly but do not know what I did wrong.Can you help.The taste was spot on but not the texture.
Ashley says
Same I even tried twice
Spirit Hoffman says
Everyone measures flour differently by the cup which can cause a whole host of disappointing results that aren’t your fault… including dense loaves. I would always look for recipes measured in grams… a scale is worth it’s weight in gold and the best way to get a wonderful loaf of bread every time. Trying to convert a cup measured recipe to grams doesn’t work well either.
Josie Poolook says
Making these today! They look so yummy! Hopefully I will get back & post how they turned out. Thank you for this recipe.
Mike says
So this is ‘oat’ bread when you have 3 cups wheat flour and 3/4 cup of oats???
Jessica says
Yep!
Vanessa Campbell says
First time making bread such as this. I’ve made banana bread, but thats different. Anyways, I was pleasantly surprised it came out well. Followed the directions. Couldn’t wait for the bread to cool before trying it. Honestly, I love baking and I don’t think I’ll be buying store bread anymore.
Fliss says
This is amazing! I think I overproofed mine, it turned out rather crumbly, but still soft and delicious! I also drizzled some extra honey over the loaf when it was fresh from the oven, which made it sticky but in my opinion even better. Thanks so much for sharing the recipe!
Alison says
That extra honey sounds perfect! Thank you for sharing!
Tana says
Can this be made the night before and placed in the fridge overnight?
Jessica says
Yes, you’ll just have to allow time for the dough to come back to room temp before baking or you might end up with a very small, dense loaf.
Dayne Conn says
This recipe is amazing! My family even agrees with me!
Shen says
Same with mine too. The texture is dense. 😞
Too Dense says
This bread turned out very dense and stodgy. It’s not due to dead yeast as I had good rises and proofed the yeast in warm milk beforehand. I suspect that it’s due to the oats within the dough. Wasted a lot of time and effort kneading it and was very disappointed with the result. Not recommended.
Kenny says
Nice light loaf, although dough was quite sticky. Baked them in a smaller pan for a higher loaf. Won a blue ribbon at a county fair on this, will be entering it in the state fair, too.
Gale says
Can I double recipe to make 2 loaves?
Alison says
Yes!
Jenooi says
I’ll be trying it. Is this recipe suitable for bread maker? Thank you.
Nicole says
While I have not tried it, you should be able to make this recipe in your bread maker by placing the ingredients into your bread maker in the order listed on your owner’s manual. Select “dough setting” and then place it into a prepared bread pan and oven bake it or allow the bread maker to cook it completely depending on what you would prefer.
Michelle says
Brushed the warm honey on top exactly where recipe stated and the loaf has only been in the oven 10 minutes Abd is already completely black on top. It’s unfortunate bc it was a waste of ingredients and time, and otherwise may have turned out okay.
Jessica says
Is your oven rack really close to the heating element? Do you bake things often? Crazy that something would burn in 10 minutes. At any rate, something didn’t go right at all, sorry about that!
Janel says
Love it! Never made bread before and worked perfectly. We all enjoyed it. Thank you!!
Alison says
So happy to hear you all enjoyed this one Janel!
Fundy says
Could I make this with just whole wheat flower? Also if it’s not too much work could you supply the weight measurements of the ingredients? Thanks so much for sharing this amazing recipe!
Nicole says
I havent tried this recipe with just whole wheat but I do know that whole wheat would result in more moisture being needed in the dough so it will be a bit of a trial and error to get it right.
Sandra Perez says
Haven’t made this recipe just yet. But can I freeze the bread once it’s cooled?
Nicole says
Yes, after the bread has been baked and cooled completely wrap it well in plastic wrap and then store it in an airtight container or gallon sized Ziploc baggie (the added wrapping helps to prevent freezer burn.) Freeze for up to 3 months.
Debora says
I have been baking bread for a long time and I just loved this bread.
Nicole says
We’re glad to hear it 🙂
Lynda says
I made this recipe for the first time today, and it was an EPIC FAIL! So disappointed. I’ll freely admit, although I’ve been baking for decades, bread has always intimidated me. This attempt was only the second or third time I’ve tried my hand at bread. I chose this recipe because I liked the ingredients and it promoted the use of my Kitchen Aid for kneading. I followed your recipe faithfully, but the bread dough was slow to rise for both rises, so I gave it extra time. I feel like brushing the top crust with honey retarded the second rise also. Plus, the honey dripped down to the bottom of the pan and burned. Overall, the bread is tasty, but heavy, and the crust is tough and burned in places. Any recommendations for improvement?
Nicole says
not rising properly and turning out heavy can be a result of you not properly kneading the bread. Another issue could have been bad yeast or poorly activated yeast (meaning that the liquids weren’t warm enough or were too hot to get the yeast to work properly.) Youre looking for dough that’s kneaded to the point that it is smooth and elastic and when you poke it with your finer it springs back and fills in that gap. the liquids used should also be about 110 degrees F.