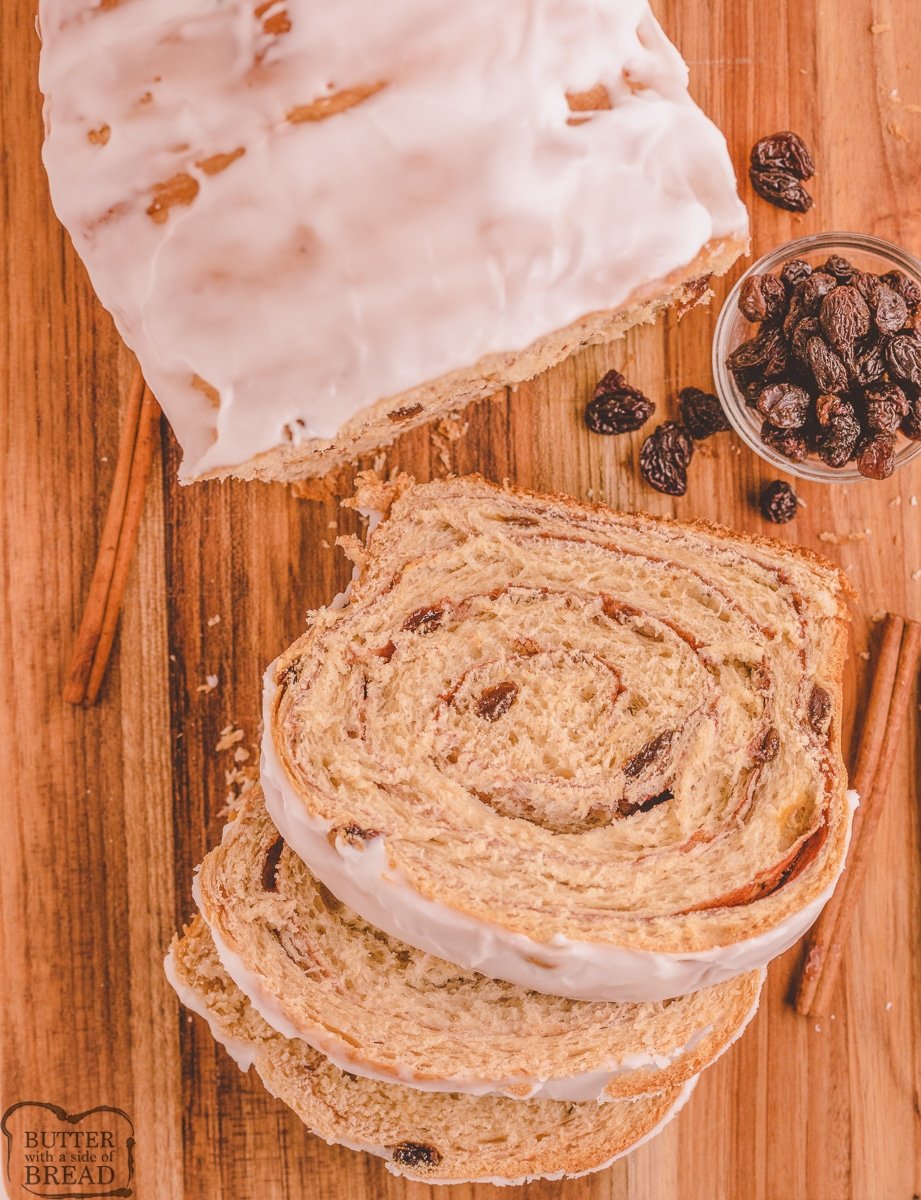
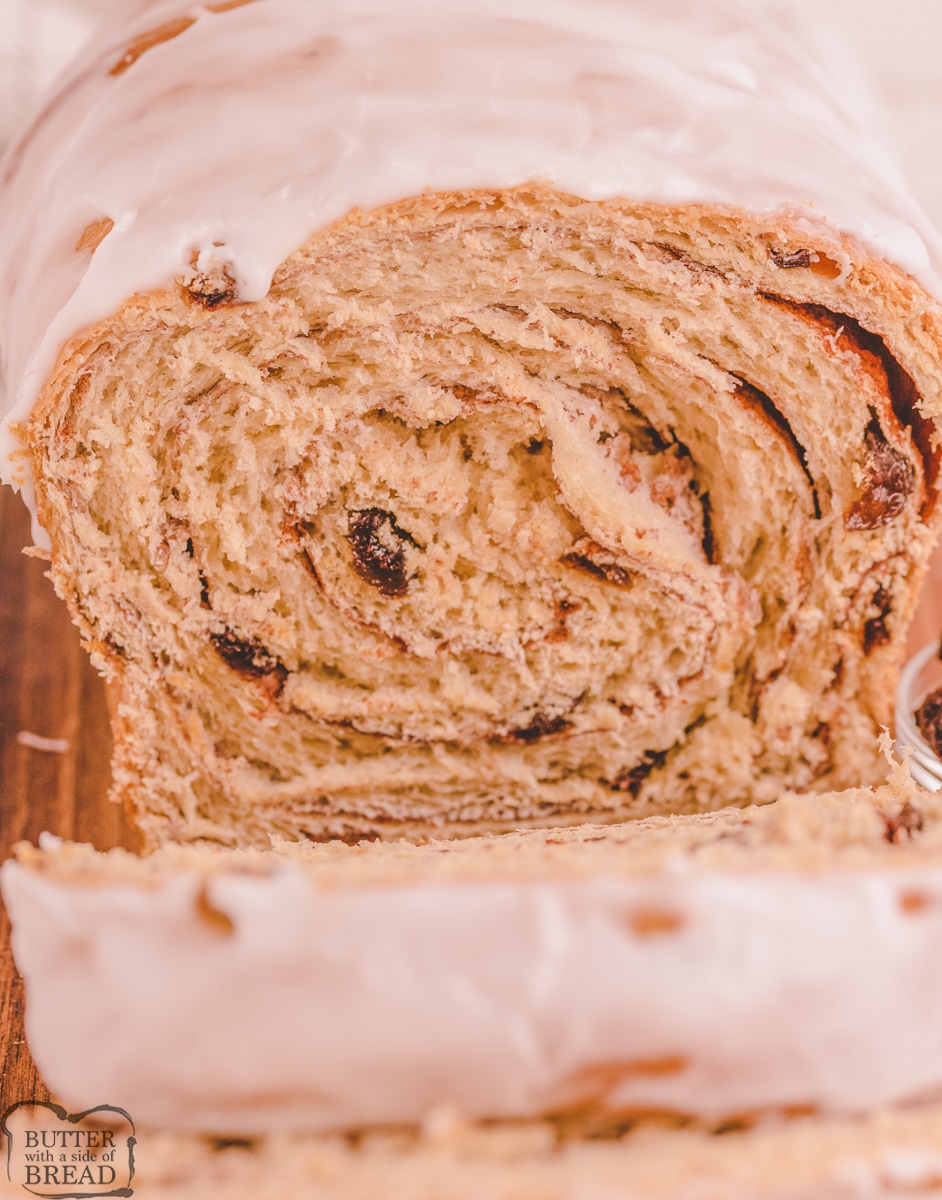
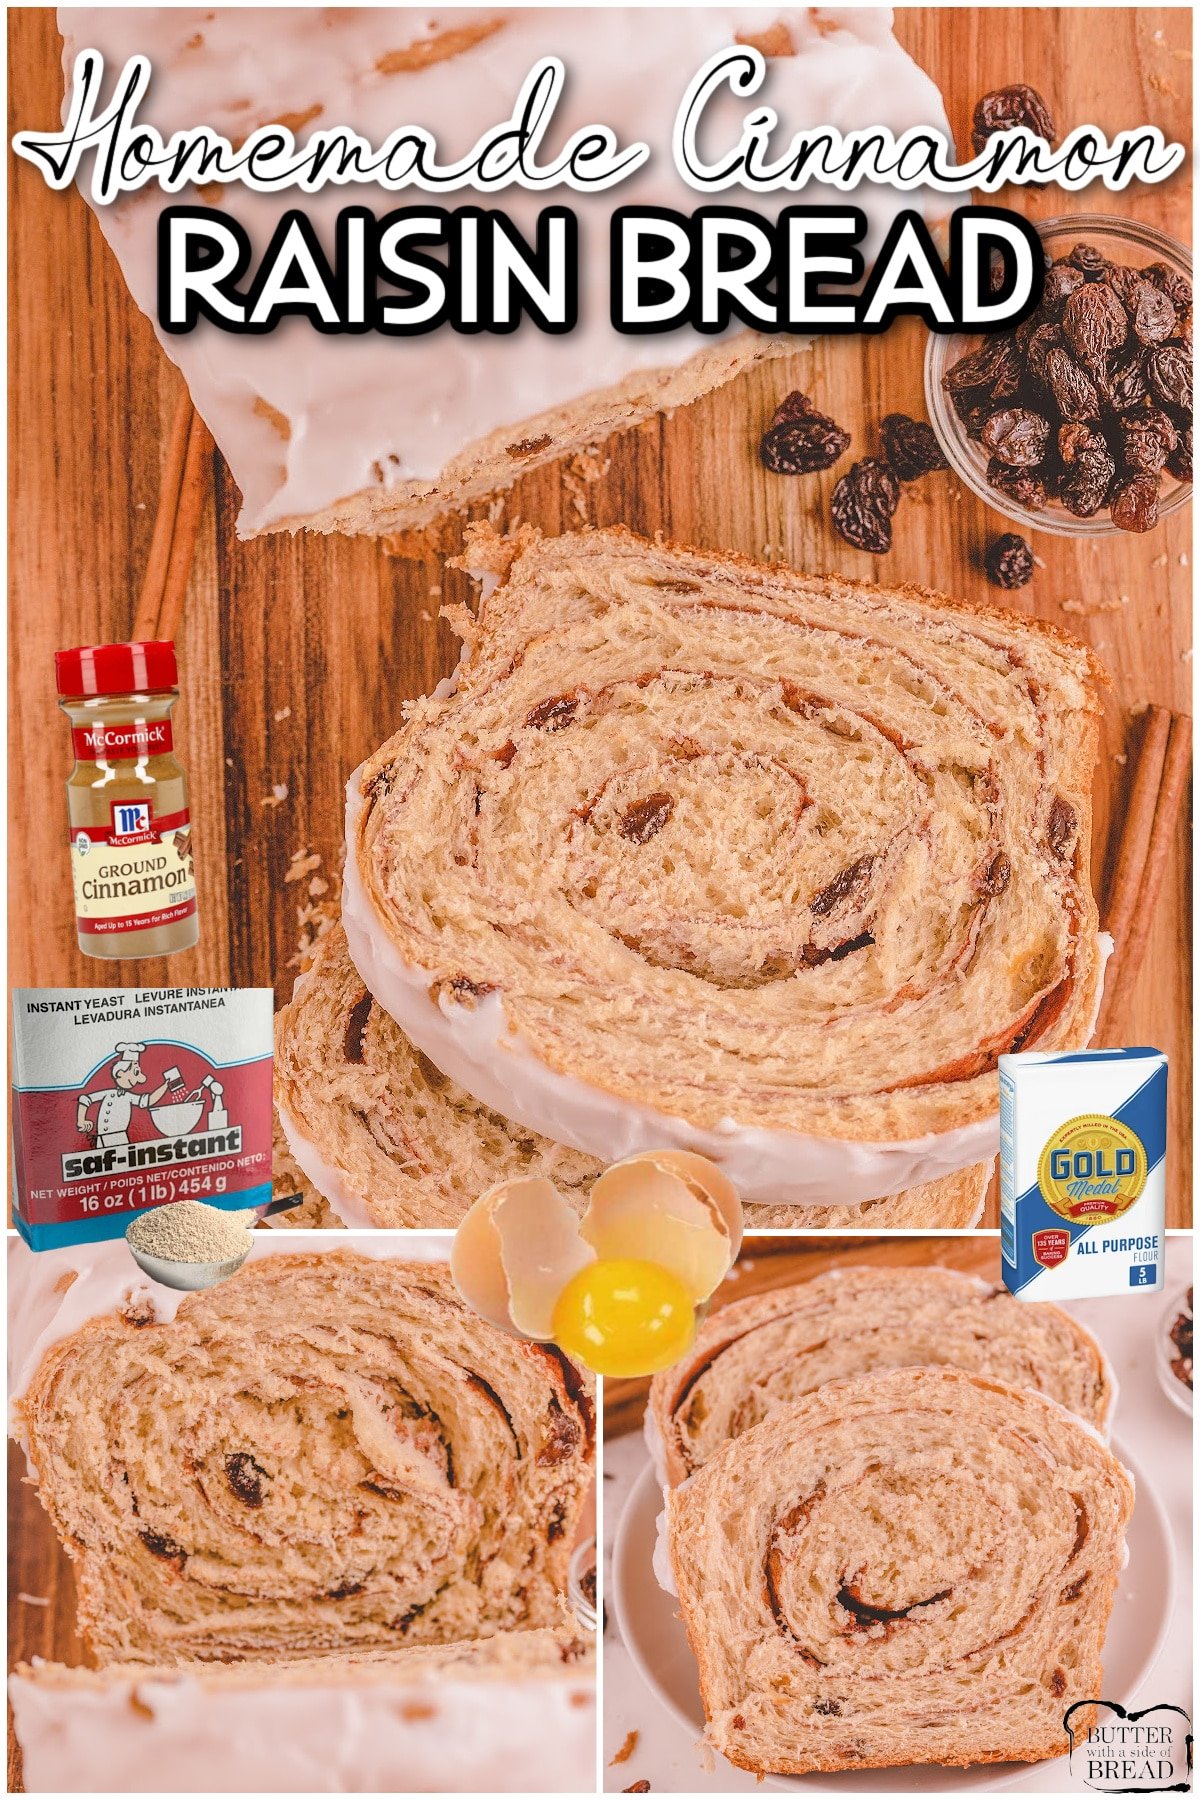
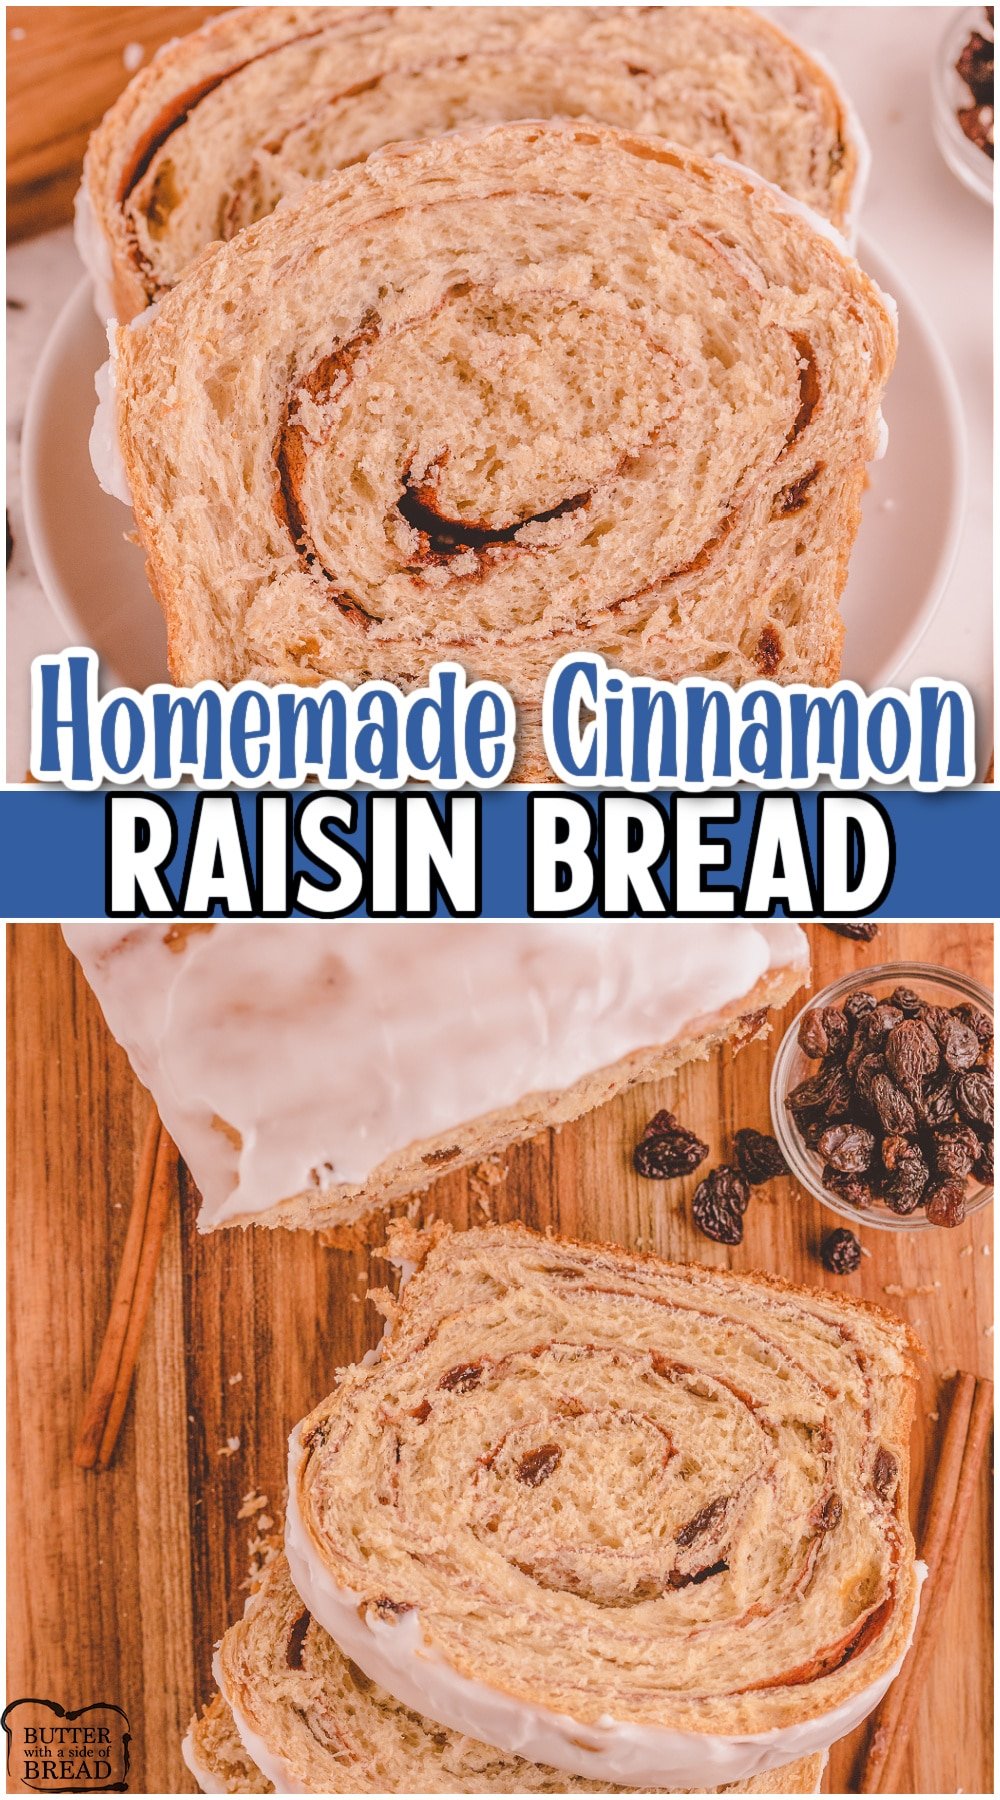
Cinnamon Raisin Bread is a soft, fluffy bread with cinnamon swirl inside & sweet glaze on top! Perfect homemade Cinnamon Raisin Bread Recipe that everyone will love!
This cinnamon raisin swirl bread is so amazing and it is a great way to warm up the house for a few hours (perfect for colder months when you don not want to turn up the heater). Plus you get a delicious treat after- not a bad trade, eh?
Making your own cinnamon raisin bread from scratch is always more frugal than buying it from the store and this homemade raisin bread makes enough for 2 large loaves (or 3 smaller ones) but if you are only looking for a single loaf, you can easily cut this recipe in half!
Cinnamon Raisin Swirl Bread
I like to use my Kitchenaid mixer to mix and knead the bread because it saves me a lot of time and effort. You can choose to knead by hand if you would like, just know that it does take longer this way.
Also, this recipe uses Dough Enhancer which you can choose to buy at Winco or on Amazon, or omit from the recipe completely. I personally love how it helps to strengthen the elasticity of the dough and improves the texture and taste. I no longer bake bread without it!

Cinnamon Raisin Bread Ingredients
Activate the Yeast
-Milk: You will need 1 ½ cups of milk to help get a fluffy bread texture.
-Water: Use 1 cup of warm water (no hotter than 110 degrees F) to help activate the yeast.
-Yeast: To make the dough puff up and rise you will need 4 ½ teaspoons of active dry yeast. This is what you get from two yeast packets.
Dough
-Eggs: Use 3 eggs for a rich taste and nice bread texture and binder.
-Sugar: You will need ½ cup of granulated sugar to make the bread nice and sweet.
-Salt: You will need 1 teaspoon of salt to help bring out the natural flavors in this bread.
-Cinnamon: Use 2 teaspoons of ground cinnamon to make the dough taste delicious.
-Margarine or Butter: You will need ½ cup of softened margarine or butter to give the bread added fats to stay moist.
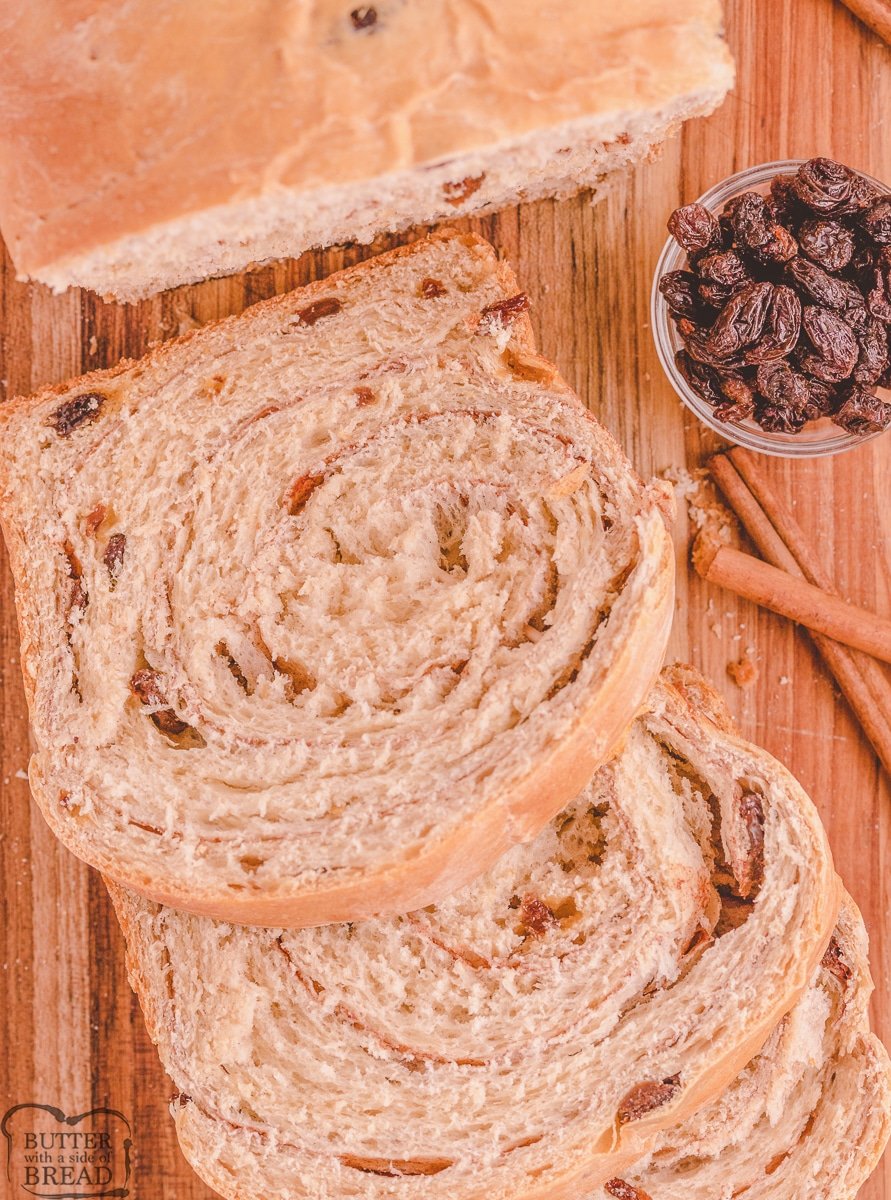
-Raisins: You will need 1 cup of raisins for a perfect balance in the bread.
-Dough enhancer: To help the bread turn out extra fluffy use 2 rounded tablespoons of dough enhancer. This is optional and can be excluded if desired.
-Flour: You will need 8 cups of all-purpose flour for the base of this dough.
Filling
-Milk: You will want to use 2 tablespoons of milk to make the dough moist enough to hold the filling in place.
-Sugar: Use ¾ cups of granulated sugar to make the swirled filling inside of the bread taste nice and sweet.
-Cinnamon: You will need 2 tablespoons of ground cinnamon to make the filling taste rich with warm spices.
How to Make Cinnamon Raisin Bread
Activate the yeast
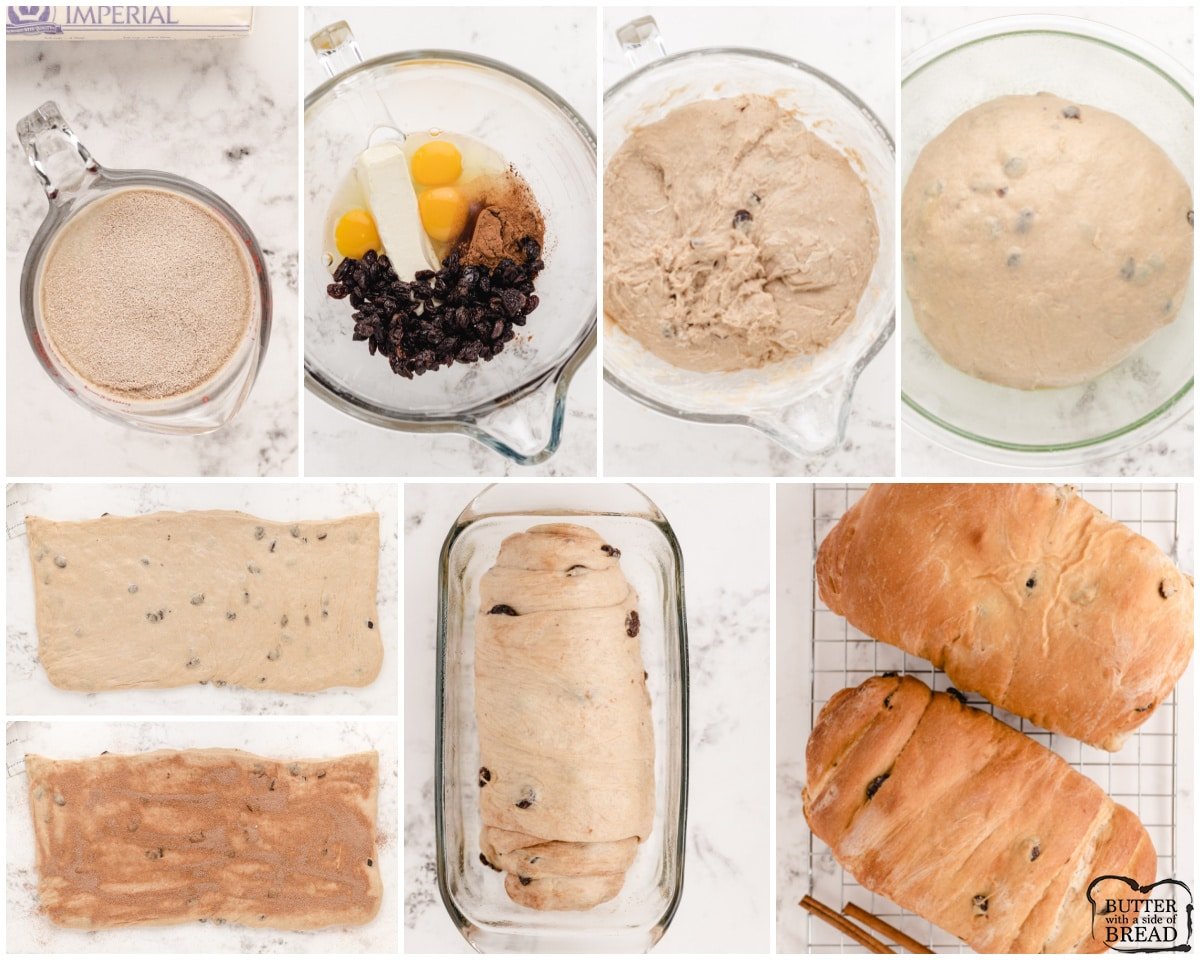
Start by warming the milk in a small saucepan until it bubbles, then remove it from the heat. Let it cool until it is lukewarm. I just heat mine until lukewarm in the microwave!
Then, dissolve the yeast in warm water, and then set aside until the yeast is frothy.
Making the dough
In a large mixing bowl or the bowl of a Kitchen Aid mixer, combine the eggs, sugar, butter or margarine/butter, salt, cinnamon, and raisins.
Then, stir in the cooled milk and yeast mixture.
Gradually, add in the flour until the dough cleans the side of the bowl, but is still a bit sticky. I usually have a circle about an inch across on the bottom of my mixer where the dough still clings to the bowl.
Proceed to knead the dough on a lightly floured surface for a few minutes.
Let the dough rise
Place the dough in a large, greased, mixing bowl, and then rotate it in the bowl to grease all surfaces of the dough.
Then, cover with a damp cloth. Allow the dough to rise until it is doubled in size. My kitchen is usually too cool to have the dough rise on the counter, so I turn the oven on for about 30 seconds, turn it off and let the dough rise in there.
Something I’ve also started doing with my bread is to let it sit in the fridge for 2 hours after the first rise. I got this tip from a reader who attended a class of mine and I have to say- thank you! It really helps develop the texture and taste of the bread! So if you have time, cover it with plastic wrap and let it sit for a couple of hours in the fridge!
Roll it out
Roll the dough out on a lightly floured surface into a large rectangle about ½ inch thick.
Add filling
Moisten the dough with 2 tablespoons of milk.
In a small bowl, mix together 3/4 cup sugar and 2 tablespoons cinnamon, and then sprinkle the mixture on top of the moistened dough.
Roll into a log
Roll it up tightly; the roll should be about 3 inches in diameter. Pinch the seams as best as you can.
Cut the dough into thirds, and tuck ends under each loaf.
Rise and bake
Place loaves into well greased 9 x 5 inch pans. Let rise again for 1 hour.
Bake at 350 degrees for 15 minutes, then place a piece of foil over the top. Don’t worry about tucking the edges under or anything, you are just preventing the top from browning too much, so just lay it over the top.
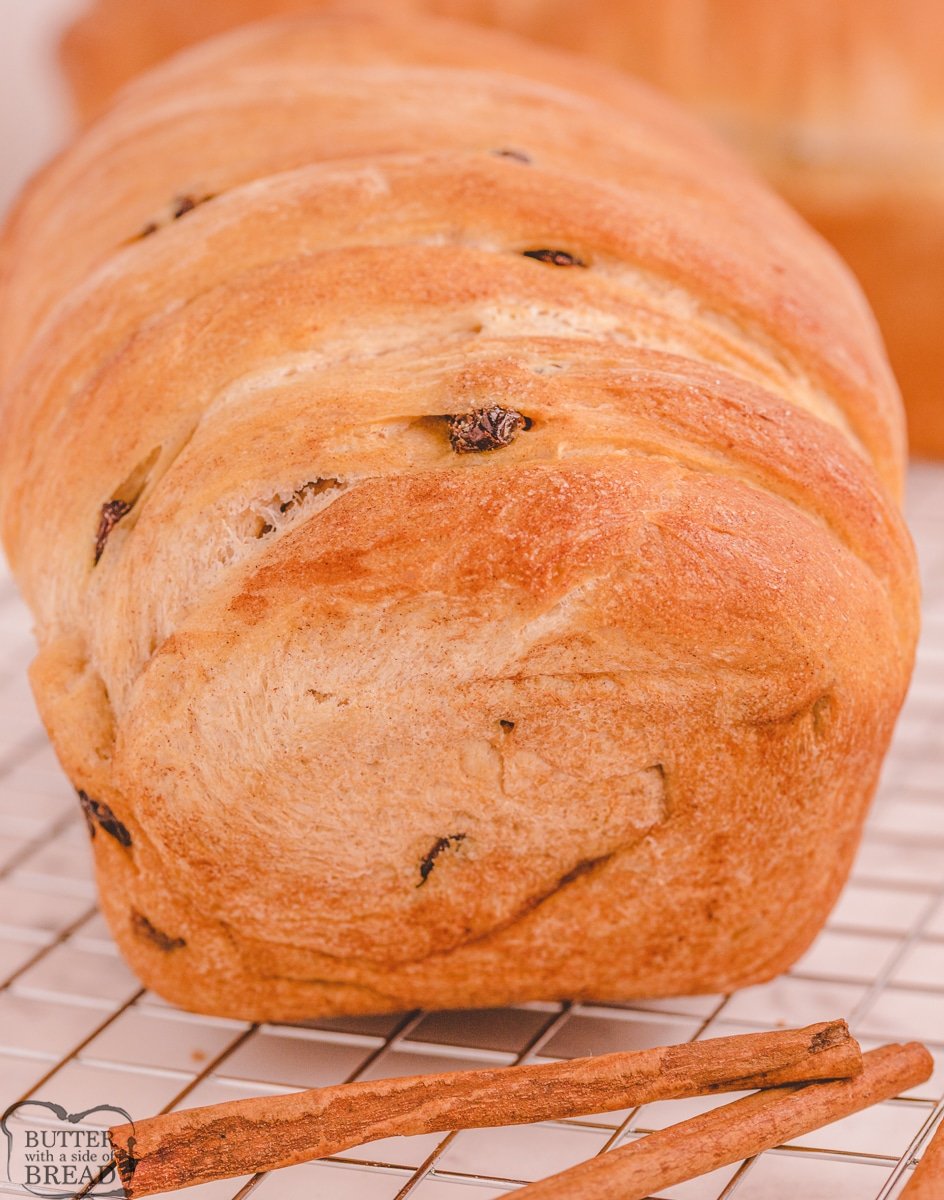
Bake for an additional 30 minutes or until the loaves are lightly browned and sound hollow when knocked.
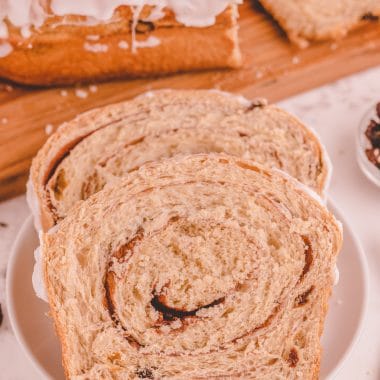
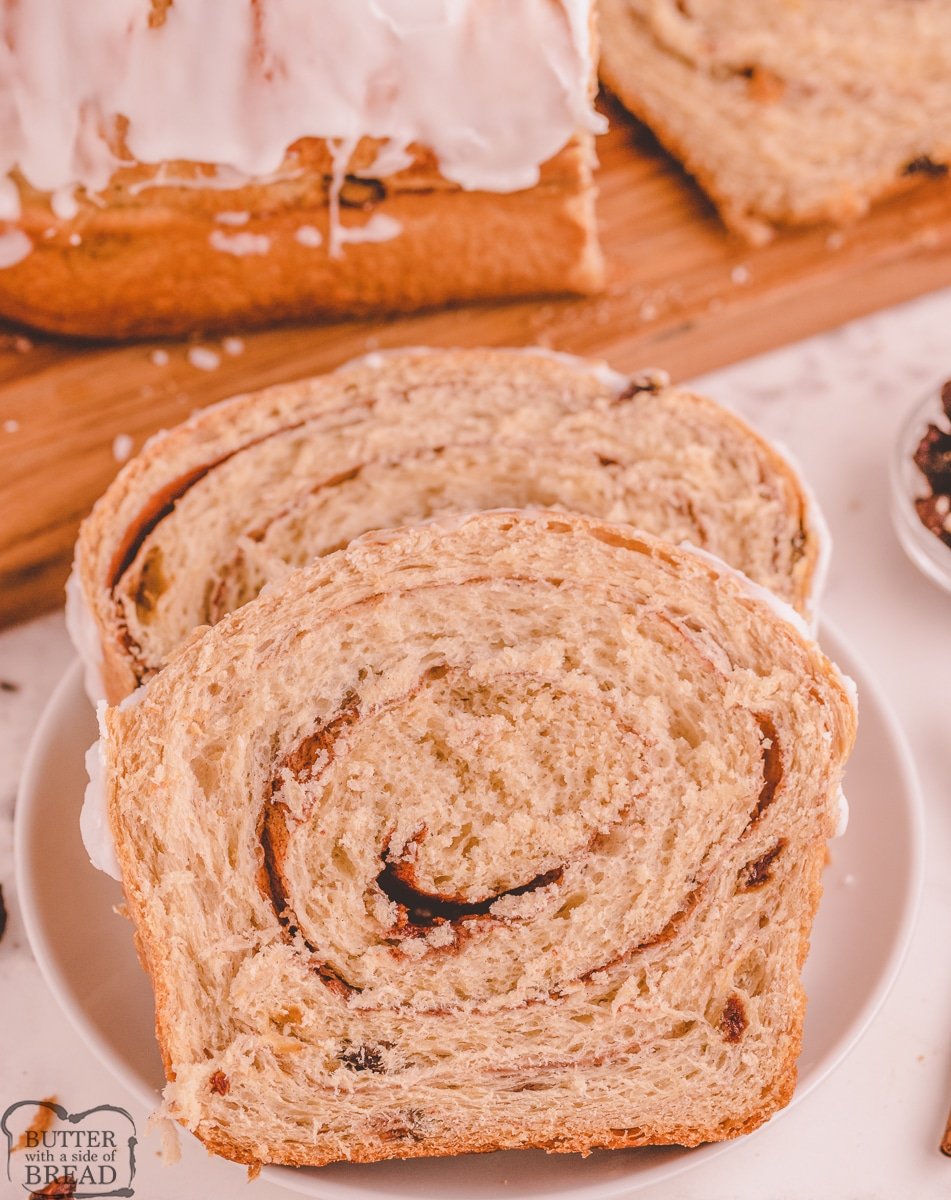
Remove the loaves from the pans, and brush with melted butter or margarine.
Let cool before slicing.
Enjoy!
Cinnamon Raisin Bread Recipe
Ingredients
Dough
- 1 ½ cups Milk
- 1 cup Warm Water (110 degrees)
- 4 ½ tsp Active Dry Yeast 2 packets
- 3 Eggs
- ½ cup Sugar
- 1 tsp Salt
- 2 tsp Cinnamon
- ½ cup butter softened
- 1 cup Raisins
- 8 cups All Purpose Flour
Cinnamon Filling Inside of the Bread
- 2 TBSP Milk
- ¾ cup White Sugar
- 2 TBSP Ground Cinnamon
Sweet Glaze
- 1 cup powdered sugar
- 1-2 TBSP hot water
Instructions
- Start by warming the milk in a small saucepan until it bubbles, then remove it from the heat. Let it cool until it is lukewarm. I just heat mine until lukewarm in the microwave.
- Then, dissolve the yeast in warm water, and then set aside until the yeast is frothy
- In a large mixing bowl or the bowl of a Kitchen Aid mixer, combine the eggs, sugar, butter, salt, cinnamon, and raisins. Then, stir in the warm milk and yeast mixture.
- Gradually, add in the flour until the dough cleans the side of the bowl, but is still a bit sticky. I usually have a circle about an inch across on the bottom of my mixer where the dough still clings to the bowl.
- Knead the dough on a lightly floured surface (or in the mixer!) for 5 minutes.
- Place the dough in a large, greased mixing bowl, and then rotate it in the bowl to grease all surfaces of the dough. Then, cover with a damp cloth. Allow the dough to rise until it is doubled in size. My kitchen is usually too cool to have the dough rise on the counter, so I turn the oven on for about 30 seconds, turn it off and let the dough rise in there.
- Divide the dough in half, then roll the dough out on a lightly floured surface into 2 large rectangles about ½ inch thick. Brush the dough with 2 tablespoons of milk.
- In a small bowl, mix together 3/4 cup sugar and 2 tablespoons cinnamon, and then sprinkle the mixture on top of the moistened dough.
- Roll it up tightly; the roll should be about 3 inches in diameter. Pinch the seams as best as you can. Tuck the ends of each loaf under, if desired. (It's not necessary but does look prettier!)
- Place loaves into well greased 9 x 5 inch pans. Let rise again for 1 hour.
- Bake at 350 degrees for 15 minutes, then place a piece of foil over the top. Don't worry about tucking the edges under or anything, you are just preventing the top from browning too much, so just lay it over the top.
- Bake for an additional 30 minutes or until the loaves are lightly browned and sound hollow when knocked.
- Remove the loaves from the pans, and brush with melted butter. Let cool before slicing. Enjoy!
- Whisk together 1 cup powdered sugar with 1-2 TBSP hot water. Drizzle glaze on top of each loaf. Let cool to set.
Nutrition
📫 Save this recipe! Send it to your email! 📩
I consent to receiving emails from this site.
AVOID SUNKEN BREAD
The easiest and best way to avoid sunken bread is to use a cooking thermometer to check the inside of the loaf. Fully cooked bread will register 200°F on a thermometer. My all-time favorite thermometer is the Thermapen. It’s super fast and incredibly durable. Another great cooking thermometer is the ThermoPop which is a more basic version that works just as well!
What Is The Best Bread Pan to Use?
I bake a lot of bread and the pans I prefer are either ceramic, glass or cast iron. These pans will bake bread more evenly and release the bread more easily after baking. I don’t like using dark or nonstick pans because the bread cooks unevenly. It darkens on the outside before the bread is cooked on the inside, so the coloring is uneven. Read more about which bread pan is the best here!
How to Store Cinnamon Raisin Bread
Keep your cinnamon raisin bread well wrapped in plastic wrap or inside of an airtight container like a gallon sized Ziploc bag. This will help to keep it fresh and from drying out, giving you nice soft bread every time you go back for another slice. It also helps to not cut the loaf until you’re ready to eat it.
Can You Freeze Cinnamon Raisin Bread?
Yes! This bread freezes very well! After your loaf has completely cooled down to room temperature, wrap it well in plastic wrap and transfer it to a gallon sized Ziploc bag before placing it in the freezer for up to 3 months.
What Goes Good on Cinnamon Raisin Bread?
I love my cinnamon raisin bread toasted with butter, but toasted cinnamon raisin bread with cream cheese is also really delicious. Consider turning your bread into a sweet and savory sandwich with spinach, cream cheese, thinly sliced granny smith apples and a drizzle of honey for a bite of something unique.
Enjoy this bread recipe? Here are even more recipes for homemade bread to try:
- Homemade Hawaiian Bread
- Honey Oat Bread recipe
- Parmesan Garlic Dinner Rolls
- Fabulous French Bread
- Sweet Orange Dinner Rolls
- Homemade Hawaiian Bread
- Easy Homemade Cheesy Breadsticks
- Tomato Parmesan Flatbread
- Potato Bread Recipe
- Soft Cornmeal Dinner Rolls
- White Bread Recipe
- Soft Country French Bread
- Apple Pumpkin Bread
- Honey Whole Wheat Bread
This soft and fluffy homemade cinnamon raisin bread is a delicious and simple sweet bread recipe that everyone loves!


ozone3 says
Made this yesterday and OMG … It is wonderful!!! By far the BEST bread I have ever made. Came out very light and yummy.<br /><br />Thanks for a great recipe.
Teresa Skibinski says
I’m right in the midst of the final rise of this bread. I followed your directions, including putting the dough in the refrigerator. I have never put dough in the fridge and was amazed that it continued to rise. The loaves are prepared and 1 hour has passed but it doesn’t seem that they have risen a lot. Do they need to rise longer since the dough cold?
Teresa Skibinski says
“Patience” will be my word this year. Since the dough was refrigerated for 2 hours, I was concerned about the final rise, but they are expanding quite nicely after 1 hr and 15 minutes. Thank you for all of your tips and suggestions.
Janet Reiter says
What is Dough Enhancer? And where do you buy it? What does it do? Can it be made without the dough enhancer?
Also if I wanted to make just one loaf, how many eggs would i use? One or two?
I’m surprised that dough will rise in the fridge. But when I make it, I’ll give it a try.
Jessica says
Yes, it can be made without dough enhancer! A dough enhancer is a powder that is supposed to make your dough smoother and is what commercial bakers often use to obtain the smooth textured bread you buy in the store. My bread doesn’t last long since we eat it quickly, but it is supposed to help with shelf life as well! I’d use just 1 egg for 1 loaf. And yes, dough will rise in the fridge if left long enough- overnight!
Charna says
What kind of milk would you recommend for this recipe? Also, is your loaf pan longer then 9×5?
Thanks
Charna
Jessica says
I’m a fan of using what you have on hand Charna- be it regular cow’s milk or almond milk. Both work beautifully!
Patti says
I haven’t made this yet, one reason being is that I never have milk! I do usually have fat free half and half, and buttermilk powder. Would either work? Would I need to cut the half and half, and what would be the ratio of half and to water?
Thank you!
Jessica says
Half and half will work fine!
Rachel says
At what point should the milk be added to the yeast and water mixture? I was confused by that part.
Nicole says
The milk should be added to the water and yeast to help activate the yeast (which is why it was warmed) sorry for the misunderstanding
Karen says
When you put this in the fridge do you punch it down and then refrigerate or, do you leave it in the risen state and refrigerate?