Easy Easter Bunny Kit Kat Cake Recipe
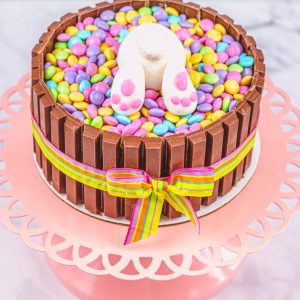
Easter Bunny KitKat Cake made easy & no one can resist this darling Easter cake! KitKats line the outside of the cake and the top has a cute Easter Bunny peeking out of pastel M&M candies.
Servings: 16
Calories: 92kcal
Ingredients
- 2 cake pans 7” size
- Chocolate cake mix plus ingredients listed on box- oil, water and eggs
- 2 ct chocolate frosting
- 9 ct full size kit kat bars accounting for extras in case some of the bars are broken when separating them
- 10 oz pastel colored M&Ms
- Wilton White fondant ½ of a package
- Wilton Pink Fondant a small ball
- Pastel ribbon color of your choice
Instructions
- Bake the 2 cakes according to box instructions. (Blend cake mix, water, oil and eggs in a large bowl at low speed for about 30 seconds. Beat at medium speed for about 2 minutes. Pour batter in your cake pans and bake immediately for approximately 30 minutes. Cake is done baking when a toothpick inserted in the center comes out clean. Cool completely.)
- Level cakes by slicing/ shaving cake from the top of each. Apply a thin layer of frosting to the top of the first cake then put the second cake on top.
- Apply a thin layer of chocolate frosting to keep the crumbs on the cake. Chill for about 15 minutes.
- Apply another layer of chocolate frosting.
- After frosting the cake, take the kit kat bars and break into single pieces. Place all along the side of the cake one by one until you line the entire cake with kit kat bars.
- Pour the pastel M&Ms on the top of the cake, using the whole bag.
- For the bunny butt and tail, take the white fondant ball and knead until pliable. You will need 1 large round ball for the bunny butt and 1 small ball for the tail. Take a toothpick and stick it into the small ball to give the tail texture.
- Now you need to make the bunny feet. Make two tear drop shapes of fondant and flatten slightly to give you a surface to add the bunny pads.
- With the pink fondant, make 1 large oval for the pad in the center of the bunny foot. Then, make 3 small circles for the toes. Attach these to the foot by adding a small dot of water to the pink circles and the oval pad. Repeat the process for the 2nd foot.
- Place the bunny butt on the cake and then attach the tail by adding a dot of water on the tail and placing it onto the bunny butt.
- Place the 2 feet on the back of the bunny butt and then attach with a small dot of water.
- The final step is to cut a piece of ribbon that fits around the center of the cake and use a small piece of tape to secure the ribbon together. Tie a small bow and place it onto the front of the cake. I ended up using a small dab of glue in order to attach it to the ribbon. Enjoy!
Notes
Cake can be made a day or two ahead of time. Just cover completely and store in the fridge. (Cake doesn't necessarily need to be refrigerated, but when you make it ahead of time, keeping it cool just preserves it better.)
Nutrition
Calories: 92kcal | Carbohydrates: 13g | Protein: 1g | Fat: 4g | Saturated Fat: 3g | Trans Fat: 1g | Cholesterol: 3mg | Sodium: 13mg | Potassium: 2mg | Fiber: 1g | Sugar: 11g | Vitamin A: 40IU | Vitamin C: 1mg | Calcium: 21mg | Iron: 1mg
